Settle in, this gets long! I'm going to try and get through the rest of the room in one post, then I'll another post sometime with some of my organizational tips and such.
After the
fabric on the ceiling post, I showed you the
doorway wall. Now I'm going to move to the back wall. It took me awhile to accept the back wall as the "back" of the room - when I was a student in this room, it was the front. But when the SMART Board was added to the room, it was put on the back wall for many logistical reasons, thus turning that into the front of the classroom. Not ideal for the way I would really like the layout of the room to be, but I'm pretty sure they aren't willing to move the projector, SMART Board, wiring, internet hook-ups, etc... for me, so I have made it work!
So here we go, with the back of the room.
If you remember from the
"Before" Pictures, this orange alphabet bulletin board used to be a chalkboard. (You can still see a sliver of it on the far right.) To transform it into a bulletin board, I bought 1/2 inch insulating sheathing (
this stuff), cut it to size and attached it to the chalkboard using small strips of velcro. When I taught Kindergarten, I had a Word Wall and I really wanted something similar for Preschool, so I use this as an "Object Wall" for learning beginning wounds of words. Throughout the year, we attach objects under the letters...a marker will go under the Mm and a crayon will go under the Cc. Students also bring pictures from magazines and catalogs in to attach to the wall. The desk is for a student teacher that will be joining us during 2nd Quarter.
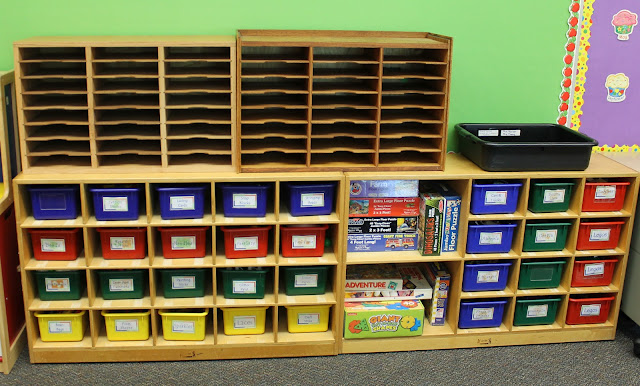
There is also a rolling toy box (another project I had my dad make) with wooden blocks and a shelving unit (another dad project) with various toys and puzzles.
I have created a divider for the library using my filing cabinets - they are set back to back against the wall), the "Book Nook" (yet another dad project!) and a wooden cabinet. This filing cabinet hold my reading, math and seasonal files. The students get to use the Book Nook for reading during choice time or if they finish a project early. The curtains are held up with a tension rod and the bottom cushion is a 5" piece of foam that I covered in fleece (it's super comfy!) The wooden cabinet holds games, puzzles, and manipulatives that we use during Centers.
Next up is the Library! I LOVE my Classroom Library, probably because I have spent many hours putting it together over the years. The filing cabinet in the back is filled with more books, the top 2 drawers are organized by category and the bottom 2 are organized by month. The rug was $19 at ShopKo one year as part of their Dorm Room collection and it's held up great.
This giant Open Faced book shelf cost me $5! I was walking past a Hallmark store that was going out of business one day and they had a section of their card displays on the sidewalk with a $5 sign on it. I ran in and bought one, had a coworker help me haul it to my car, and got my dad to put legs on it for me! It's positioned back to back with the Book Nook. On top of the Book Nook, I have an Under-the-Bed Storage Box that I use for Bulletin Board Boarders and Letters and other miscellaneous things. The bins on top of the filing cabinets are from Wal-Mart and they hold extra crayons, markers, glue sticks, etc.

The majority of the books are in these bins. All of the white bins are actually Ice Cube containers that I bought at Target. They work great from primary aged books because some of them are so big! The books are sorted into categories and have a colored sticker on the spine so the students are able to get them back in the correct bin. The bins are labeled using a colored sticker and the same Self Adhesive Business Card Holders I used on the bins I talked about the other day. That red bin on the top by the window is the Book Hospital; if a student finds a book that needs repair they can just put it in there. We call the round pillows "Reading Spots" and students can use them to read anywhere in the room when they finish their work early. (I bought them at Lakeshore.) I love to buy stuffed animals at Kohl's from their "Kohl's Cares for Kids. That's where the Pig, Mouse and Moose came from. They are only $5 a piece and are so soft!

This year, I added a bunch of lanterns and pompoms to this corner just for fun! :)
Still with me?? We are onto the Window Wall. Half of the Library is on the right side of this wall. The middle section holds some toys (the blocks, semi truck, Lincoln Logs, the barn, etc.)
Then we have the Writing Center. It's stocked with markers, crayons, scissors, glue, paper, and stencils for the students to use during Choice Time. This year, I added the wrapping paper to the back panel of the shelves (Thanks, Pinterest!)
The next set of built in shelves hold the curriculum I need for Centers. I also added wrapping paper to the back panels of these shelves. (Found all the wrapping paper at Target.) The blue organizers on the top are from Lakeshore and I added colored buttons to them so I know what belongs in each one.
This corner shelf is kind of a mess, but I promise I will have it all organized once we get the year started. It hold curriculum, assessment materials, catalogs, and lots of other things. (I think I'll do another post to share how I stay organized and make planning a cinch!) I painted that bookshelf orange last year, it was the same old dingy cream color the rest of the room used to be.
And onto the Front Wall! Not much to this space...storage on the left, sink, Calendar, SMART Board (not sure how I taught without one!) and my desk .
Rather than having a second computer cart, I just keep my computer on my desk. Like the other desks in the room, the front of mine is pushed against the wall to save space. I use the Yellow Bulletin Board to hang up all the pictures and projects the students make for me. (They love that!)
My two classroom rules are above the SMART Board: Be Kind and Follow Directions. The Daily Schedule is listed on the right and the calendar is on the left. The storage drawers on the floor hold the other calendar pieces, CDs, and games we use during our Opening Meeting.
These last four pictures are centered on the corners so you can get an idea of what the middle of the room looks like...
I love having that Kidney Table right behind my desk. I can just turn my chair around to teach my center or work with small groups.
I still need to add the Chair Pockets I made to the chairs, so check back for that!
So there it is! Sorry that got so long and thanks for sticking with me if you made it all the way through! Again, if you have questions or want more details about anything in my room, let me know.
Thanks for stopping by!
~Anika


